78% percent of American Broadband homeowners today have a Wireless network or Wi-Fi network that they can use to connect to their home’s internet connection conveniently with laptops, smartphones, tablets, and other devices. This is highly convenient but also opens your WiFi connection up to potential security risks. A wireless network can be accessed by people outside of your home, and it can be exploited if it isn’t protected properly. In this article, I am listing 7 easy steps to secure home WiFi network from hackers.
WiFi intruders can use up your internet bandwidth and slow down your network connection, they can connect and download illegal software or files and they can even access the devices throughout your home. That’s why it’s so important to take steps to secure your wireless network properly. Below are seven simple steps you can take to make your home network secure and protect your internet connection and your devices at the same time. Follow the steps and protect yourself today.
| 7 Easy steps to secure WiFi Network |
|---|
| 1. Change your Default SSID or Hide Your SSID |
| 2. MAC Address Filtering |
| 3. Network Encryption |
| 4. Upgrade Wi-Fi Firmware Regularly |
| 5. Setup Guest Wi-Fi Network |
| 6. Establish a Strong Router Panel Password |
| 7. Turn off Admin Access Via Wireless |
1. Change your Default SSID or Hide Your SSID
One of the first steps that users should take after setting up a wireless network is to change the SSID or service set identifier to make it more difficult to access. This is the name of your wireless network and it is how you’ll identify which is yours.
Changing your network name shows that you’ve taken the time to secure your network and makes it a less likely target for hackers looking to take advantage of your internet connection.
| Step by step Instructions to change SSID |
|---|
| 1. To change the network name you need to visit your router’s control panel. This can be accomplished by opening up an internet browser on a computer that is connected to your wireless network. Now type in the IP address of your router. For some, the IP is 192.168.1.1 but it varies based on your router’s brand. Look up the IP and the default log-in information for your router’s back or bottom of your router. |
| 2. Log in as Administrator to check/change your router settings |
| 3. Check for SSID or Wireless name – update it to a memorable name that you will easily recognize |
This makes it easier to recognize your WiFi network, and also shows that you care about your network’s security. While adjusting the SSID name you can also choose to hide your SSID. This will make it more difficult to connect your device’s to the network but will serve as an added layer of security to keep others from targeting your network connection.
2. MAC Address Filtering
MAC address filtering is a powerful way to secure your Wi-Fi network connection by picking and choosing specifically which devices are allowed to utilize your network. This technique uses the MAC addresses of your devices to identify apart from the other devices trying to utilize your internet connection.
To make the technique work you need to identify the MAC addresses of all your devices and implement MAC address filtering on your router. Once it’s enabled you simply add the MAC address of each item you want to have access, and all others will be prevented from using the wireless network connection.
Getting the MAC Addresses
There are several ways to obtain the MAC addresses of your network devices. I’ll cover a Windows PC and Android phone below, but other devices are just as simple to do.
| Windows PC |
|---|
| 1. Type in CMD on Windows search bar and press enter |
| 2. Type in “ipconfig /all” in the command prompt window |
| 3. The MAC address will appear on the command prompt window under “Adapter” |
| 4. Take the “Physical Address” from the command window, that’s the MAC address. |
| Android Phone or Tablet |
|---|
| 1. Go into the “Settings” menu on the device, Choose “Wireless and Networks” |
| 2. Choose “Wi-Fi Settings” or select “Hardware Info” |
| 3. Go into the “Advanced” section. |
| 4. The MAC address should be visible under this section |
Steps to Implement MAC Address Filtering:
Now that you have your list of MAC addresses you can implement MAC filtering to keep unwanted devices off your network. To do this open your router control panel and go under the wireless security settings. There should be a section for MAC filtering. Under this heading, you can enter in the MAC addresses that you’ve collected to enable all your devices to connect.
3. Network Encryption
The most effective way to protect your network from unwanted users is to add a layer of encryption to it. This means setting a secure network password that is protected by a hexadecimal key to keeping users from uncovering the password. Three different types of encryption can be added to your home network, and each is simple to implement in just a few minutes. When your wireless network is encrypted, only the users with your network password will be able to sign in and start using your wireless network.
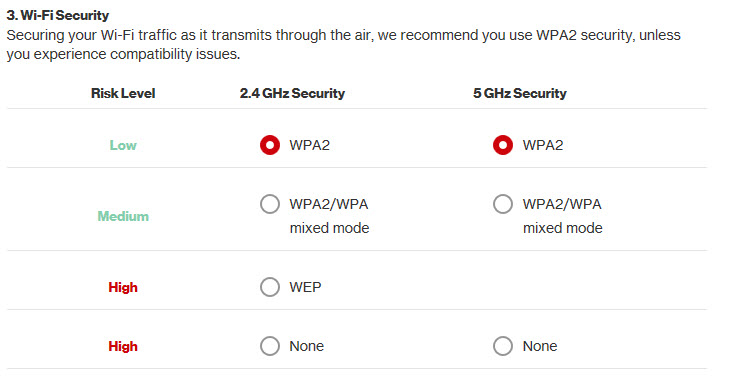
Encryption options are split up into WEP, WPA, and WPA2. WEP is considered to be the weakest, while WPA2 is the most powerful option of the bunch. Most users today will enable WPA2 encryption when password-protecting their wireless networks and this is the option that you should go with as well for maximum protection. When establishing a new wireless network, make sure to choose WPA2 as your encryption option if it’s possible. If it isn’t available choose WAP as the next option and only rely on WEP as a last resort.
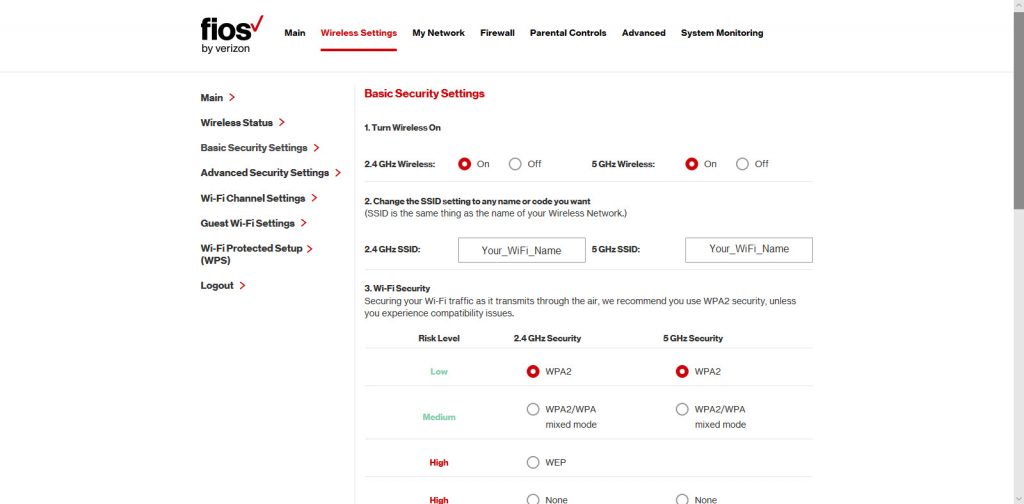
Encrypting Your Network and connect to it:
If your wireless network isn’t encrypted, you’ll have to access your router’s control panel using the steps described up in the first step of this article. Once within the panel you can change up your encryption option and set a password for your network under the Wireless Settings menu. It only takes a moment to establish the encryption type. Make sure to write down the security key or password for your network as well as the encryption type used, because this information will help you connect your devices.
There are three options to connect your network devices. The first is to manually select the SSID name and type in your password to connect. The second is to use WPS and click a special WPS button on your router to connect specific devices. The final tool is called Wireless Connect Now. You create a special USB flash drive that can set the network settings on all Windows 10 devices automatically by inserting the drive and clicking a single button. No matter which option you decide to go with you can easily connect all your devices to your encrypted network when you understand these techniques.
4. Upgrade Wi-Fi Firmware Regularly
Over time older wireless routers will develop security holes that hackers can use to access your network and all your devices. To prevent this from happening router manufacturer’s update the software the router uses to close up those holes and keep you safe. Unfortunately, it is up to you to update your router when the updates are released. There are a few ways for you to do this. On older devices, you will have to download the new firmware from the manufacturer’s website and install it to the router manually.
On newer devices, you simply open up the router’s control panel and click on the update button. The router will then download the firmware itself and go through the update process all on its own. No matter which type of router you have you must take the time to update its firmware to prevent the security holes from forming.
In case of Fios router with Firmware version 02.02.00.XX, Easy way of firmware update:

- At your Router, Press and hold the WPS button for 10 seconds to reboot it.
- Router automatically connects to the Verizon’s network, install the firmware.
5. Setup Guest Wi-Fi Network
A Guest network is a powerful tool that creates a separate access point for any guests that visit your home to use. Most people have guests that come over from time-to-time and it’s common for guests to ask for network access these days. To keep your network secure while being hospitable you just need a guest network implemented. Your guest network won’t have your important devices connected to it so your home is more protected.
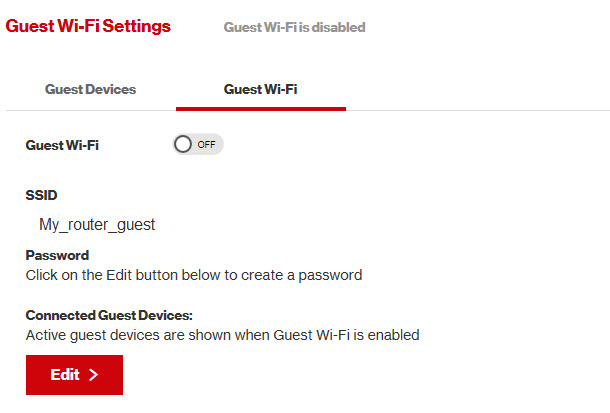
To create a guest network access your router control panel using the steps outlined in step one up above. Now visit the wireless or Wi-Fi section of your router’s settings. Choose the Guest Network option and make sure the network is enabled. Now set the SSID name, the encryption type and the password for your guest network. Provide your guests with your guest network password and they can conveniently access the separate wireless network.
6. Establish a Strong Router Panel Password
Routers sent out today come with a default user account and password to access the control panel. This makes it very easy for people to get into your router’s panel and change any settings that they like. These passwords are well known and even written in the manuals for the routers. That’s why it’s so important to create a new username and password for your router’s control panel after you get your network setup. Fortunately, this is simple to do.
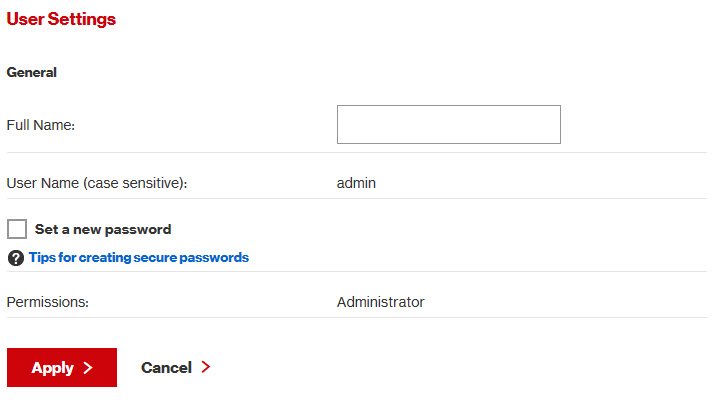
To change the account password sign onto your router’s control panel using the steps outlined in Step 1 of this article. Once in the control panel visit the Administration section. Here, there is an option to change the password of the control panel. Switch it to a lengthy password that utilizes capital and lowercase letters as well as at least one symbol. Make sure you write down this password somewhere so you know how to access your router’s control panel. Once you’ve done this your home network will be considerably more secure.
7. Turn off Admin Access Via Wireless
After you set up your wireless router you can easily open up its control panel by typing in the device’s network IP address and entering in the control panel username and password information. You can do this on wired and wireless devices both without issue. While this is very convenient for changing up settings on your network, it’s also insecure. It’s better to disallow wireless devices from accessing the control panel at all. That way only users with physical access to your wireless router can make changes to its control panel.
To do this access your router’s control panel using the steps outlined in Step 1 of this article. Once in your control panel visit the Administration section of the panel. Find the Wireless Access Web option and set it to Disable instead of Enable. This will make it impossible for wireless devices to access the control panel at all. Now each time that you have to make changes to the panel you will have to connect to it using a wire.
By making the seven changes to your network outlined up above you can make it more secure and reliable overall. Secure your wireless network today and enjoy your safer and more reliable network.